2025년 8월 31일 일요일

RAG 시스템 돌리기

[실행 환경] windows11, python=3.10, conda 가상환경, amd 7950x CPU,  64gb main ram, RTX Titan 24Gb GPU


1. llm 모델: Qwen2.5-32B-Instruct-AWQ (Alibaba모델)

- vllm의 직접 실행이 안되어서 docker기반으로 실행

- G:\huggingface_models 폴더 아래에 다운 받은 qwen모델 있음

(testllm) G:\>docker run --gpus all -v G:\huggingface_models:/root/.cache/huggingface -p 8000:8000 --ipc=host -e HUGGING_FACE_HUB_TOKEN=hf_xxxxxxxx vllm/vllm-openai:v0.5.5 --model Qwen/Qwen2.5-32B-Instruct-AWQ --dtype float16 --served-model-name qwen2.5-32b --api-key pnu-vislab --max-model-len 2500 --gpu-memory-utilization 0.95


(option의미)

--gpu-memory-utilization 0.92: gpu메모리(vram) 이용율, 92%까지 gpu메모리 사용 가능

--api-key pnu-vislab: rag_api.py 코드 등에서 이 키를 사용해야 함

HUGGING_FACE_HUB_TOKEN=... : llm모델 다운 가능하려면 huggingface 키를 받아 사용해야 함

--served-model-name qwen2.5-32b: Qwen/Qwen2.5-32B-Instruct-AWQ모델을 사용 중인데 외부에서 refering을 위한 이름


(실행)

INFO 08-31 19:12:37 weight_utils.py:236] Using model weights format ['*.safetensors']

Loading safetensors checkpoint shards:   0% Completed | 0/5 [00:00<?, ?it/s]

Loading safetensors checkpoint shards:  20% Completed | 1/5 [01:36<06:27, 96.96s/it]

Loading safetensors checkpoint shards:  40% Completed | 2/5 [03:17<04:56, 98.87s/it]

.....

다운 받은 파일을 vram에 로드(시간 좀 걸림) 한 후, 오류가 잘 발생하는데, KV(key-value) cache memory부족 오류가 자주 뜸. 

--max-model-len 2500를 1024로 더 줄이고,

--gpu-memory-utilization 0.92를 0.95로 더 늘리고...

현재 모델을 24g vram에서 돌리기에는 빠듯한 느낌


2. 벡터 DB(qdrant) 실행

(testllm) G:\>docker run -d --name qdrant -p 6333:6333 -p 6334:6334 -v G:/qdrant_storage:/qdrant/storage qdrant/qdrant


3. 문서 인덱싱

(testllm) G:\2025\rag_server>python index_documents.py

🚀 테스트 문서 인덱싱 시작

임베딩 모델 로딩 중...

Fetching 30 files: 100%|██████████████| 30/30 [00:00<00:00, 14999.30it/s]

✅ 임베딩 모델 로드 완료

✅ Qdrant 연결 성공

⚠️  기존 컬렉션 'pet_corpus_m3' 발견. 삭제 후 재생성...

✅ 컬렉션 'pet_corpus_m3' 생성 완료

✅ 10개 문서 로드 완료

문서 임베딩 중...

You're using a XLMRobertaTokenizerFast tokenizer. Please note that with a fast tokenizer, using the __call__ method is faster than using a method to encode the text followed by a call to the pad method to get a padded encoding.

진행률: 5/10 - 벡터 차원: 1024

진행률: 10/10 - 벡터 차원: 1024

✅ 10개 포인트 생성 완료

Qdrant에 업로드 중...

✅ 인덱싱 완료: 10개 문서

📊 컬렉션 통계: 10개 포인트

⏱️  총 소요시간: 4.33초


4. RAG_API 서버 시작

(testllm) G:\2025\rag_server>python rag_api.py

G:\2025\rag_server\rag_api.py:65: DeprecationWarning:

        on_event is deprecated, use lifespan event handlers instead.

        Read more about it in the

        [FastAPI docs for Lifespan Events](https://fastapi.tiangolo.com/advanced/events/).

  @app.on_event("startup")

🐾 테스트 케어 RAG API 서버 시작

📖 API 문서: http://localhost:9000/docs

🔍 테스트: curl -X POST http://localhost:9000/chat-rag -H 'Content-Type: application/json' -d '{"question":"강아지 체온이 높을 때 어떻게 해야 하나요?"}'

INFO:     Will watch for changes in these directories: ['G:\\2025\\rag_server']

INFO:     Uvicorn running on http://0.0.0.0:9000 (Press CTRL+C to quit)

INFO:     Started reloader process [17224] using WatchFiles

INFO:     Started server process [40288]

INFO:     Waiting for application startup.

INFO:rag_api:🚀 서버 초기화 시작

INFO:rag_api:임베딩 모델 로딩...

INFO:watchfiles.main:5 changes detected

Fetching 30 files: 100%|████████████████| 30/30 [00:00<00:00, 9983.27it/s]

INFO:FlagEmbedding.finetune.embedder.encoder_only.m3.runner:loading existing colbert_linear and sparse_linear---------

INFO:rag_api:✅ 임베딩 모델 로드 완료

INFO:rag_api:Qdrant 연결 중...

INFO:httpx:HTTP Request: GET http://127.0.0.1:6333 "HTTP/1.1 200 OK"

INFO:httpx:HTTP Request: GET http://127.0.0.1:6333/collections "HTTP/1.1 200 OK"

INFO:httpx:HTTP Request: GET http://127.0.0.1:6333/collections/pet_corpus_m3 "HTTP/1.1 200 OK"

INFO:rag_api:✅ Qdrant 연결 완료 (문서 수: 10)

INFO:rag_api:vLLM 연결 중...

INFO:httpx:HTTP Request: GET http://127.0.0.1:8000/v1/models "HTTP/1.1 200 OK"

INFO:rag_api:✅ vLLM 연결 완료 (사용 가능 모델: ['qwen2.5-32b'])

INFO:rag_api:🎉 서버 초기화 완료!

INFO:     Application startup complete.

INFO:rag_api:질문 받음: 강아지 체온이 높을 때 어떻게 해야 하나요?

You're using a XLMRobertaTokenizerFast tokenizer. Please note that with a fast tokenizer, using the `__call__` method is faster than using a method to encode the text followed by a call to the `pad` method to get a padded encoding.

INFO:httpx:HTTP Request: POST http://127.0.0.1:6333/collections/pet_corpus_m3/points/search "HTTP/1.1 200 OK"

INFO:rag_api:LLM 응답 생성 중...

INFO:httpx:HTTP Request: POST http://127.0.0.1:8000/v1/chat/completions "HTTP/1.1 200 OK"

INFO:rag_api:✅ 응답 생성 완료

INFO:     127.0.0.1:59283 - "POST /chat-rag HTTP/1.1" 200 OK

INFO:httpx:HTTP Request: GET http://127.0.0.1:6333/collections/pet_corpus_m3 "HTTP/1.1 200 OK


5. 실행 예

(testllm) G:\2025\rag_server>curl -X POST http://localhost:9000/chat-rag -H "Content-Type: application/json" -d "{\"question\":\"강아지 체온이 높을 때 어떻게 해야 하나요?\"}"

{"answer":"강아지의 체온이 높을 때, 즉 40도 이상일 경우, 열사병을 의심해야 합니다. 이럴 때는 강아지를 시원한 곳으로 옮기고, 물을 조금씩 먹이도록 합니다. 하지만 이러한 증상이 계속된다면 수의사 상담을 권장드립니다.","sources":[{"text":"강아지의 적정 체온은 38-39도 사이입니다. 체온이 40도 이상이면 열사병을 의심해야 하며, 즉시 시원한 곳으로 옮기고 물을 조금씩 먹여야 합니다.","score":0.7699,"meta":{"category":"건강","species":"강아지"}},{"text":"햄스터는 온도에 민감합니다. 실내 온도는 20-24도가 적당하며, 직사광선과 급격한 온도 변화는 피해야 합니다. 겨울철에는 보온에 특히 신경써야 합니다.","score":0.592,"meta":{"category":"환경","species":"햄스터"}},{"text":"고양이가 구토를 자주 한다면 헤어볼, 식이 알레르기, 또는 소화기 질환을 의심해야 합니다. 하루에 2회 이상 구토하면 수의사 진료를 받으세요.","score":0.5769,"meta":{"category":"건강","species":"고양이"}},{"text":"강아지 치아 관리를 위해서는 주 2-3회 양치질이 필요합니다. 사람용 치약은 절대 사용하지 말고, 반려동물 전용 치약을 사용하세요.","score":0.5598,"meta":{"category":"케어","species":"강아지"}},{"text":"강아지 예방접종은 종합백신(DHPPL), 켄넬코프, 광견병이 기본입니다. 첫 접종은 생후 6-8주, 추가접종은 수의사와 상담하여 결정하세요.","score":0.5527,"meta":{"category":"건강","species":"강아지"}}],"query_info":{"question":"강아지 체온이 높을 때 어떻게 해야 하나요?","results_count":5,"filters_applied":false,"avg_score":0.6102}}


6. 다운된 도커 이미지 확인

(testllm) G:\>docker images

REPOSITORY               TAG        IMAGE ID       CREATED         SIZE

qdrant/qdrant            latest    6ac4807063bb   4 days ago      254MB

vllm/vllm-openai        latest    d731ee65c044   11 days ago     31GB


7. 실행 중인 도커 container 확인

(testllm) G:\huggingface_models>docker container ls

CONTAINER ID   IMAGE                     COMMAND                   CREATED          STATUS          PORTS                              NAMES

f03b00e22ff7   vllm/vllm-openai:v0.5.5   "python3 -m vllm.ent…"   27 seconds ago   Up 27 seconds   0.0.0.0:8000->8000/tcp             admiring_satoshi

d072b9b35f76   qdrant/qdrant             "./entrypoint.sh"         2 days ago       Up 2 days       0.0.0.0:6333-6334->6333-6334/tcp   qdrant


2025년 5월 4일 일요일

Gstreamer와 연결된 opencv 컴파일 방법

(1) gstreamer가 설치된 docker image를 다운받고 이것으로 container진입

docker pull ducksouplab/ubuntu-cuda-gstreamer:ubuntu22.04-cuda11.7.0-gstreamer1.22.0

docker run --gpus all -it ducksouplab/ubuntu-cuda-gstreamer:ubuntu22.04-cuda11.7.0-gstreamer1.22.0 /bin/bash


(2) opencv, opencv_contrib의 소스를 다운 받음

mkdir -p /opencv/src && cd /opencv/src

wget -O opencv.zip https://github.com/opencv/opencv/archive/4.7.0.zip

wget -O opencv_contrib.zip https://github.com/opencv/opencv_contrib/archive/4.7.0.zip

unzip opencv.zip && unzip opencv_contrib.zip


(3) build폴더 만듬

cd /opencv

rm -rf build

mkdir build && cd build


(4) PKG_CONFIG_PATH 초기화 (필수)

unset PKG_CONFIG_PATH


(5) cmake 구성

# 이대로 복사하면 실행 안됨. chatgpt에 넣고 다시 생성

# 당연히 src는 다 받아 놓은 상태여야

cmake -D CMAKE_BUILD_TYPE=Release \

  -D CMAKE_INSTALL_PREFIX=/usr/local \

  -D OPENCV_EXTRA_MODULES_PATH=../src/opencv_contrib-4.7.0/modules \

  -D WITH_GSTREAMER=ON \

  -D WITH_CUDA=ON \

  -D ENABLE_FAST_MATH=1 \

  -D CUDA_FAST_MATH=1 \

  -D WITH_CUBLAS=1 \

  -D WITH_V4L=ON \

  -D WITH_OPENGL=ON \

  -D BUILD_opencv_python3=ON \

  -D PYTHON3_EXECUTABLE=$(which python3) \

  -D PYTHON3_INCLUDE_DIR=$(python3 -c "from sysconfig import get_paths as gp; print(gp()['include'])") \

  -D PYTHON3_LIBRARY=$(python3 -c "from sysconfig import get_config_var; print(get_config_var('LIBDIR'))")/libpython3.10.so \

  -D BUILD_EXAMPLES=OFF ../src/opencv-4.7.0


(6) make 실행

make -j$(nproc)


(7) install 실행

make install

ldconfig


(8) 설치 확인 및 GStreamer 체크: gstreamer가 yes인지 체크

python3 -c "import cv2; print(cv2.__version__); print(cv2.getBuildInformation())"


(9) container를 이미지화

sudo docker ps -a

sudo docker commit 7b2450127c68 opencv-gst-cuda-v2:latest   # 여기서 만듬

sudo docker images

sudo docker run --gpus all -it opencv-gst-cuda-v2:latest /bin/bash


(10) Docker Hub 업로드

docker ps -a

sudo docker login -u 도커id  # 비번넣어야

sudo docker tag opencv-gst-cuda-v2:latest funmv/opencv-gst-cuda-v2:latest

sudo docker push funmv/opencv-gst-cuda-v2:latest


2025년 2월 13일 목요일

FSM (유한상태기계) 사용 해보기

transitions라는 pypi 라이브러리가 있어서 사용해 보았음. 계층 구조의 transition도 표현해주고 기능이 풍부함.

작성된 상태도를 그려보기 위해서는 pygraphviz설치가 필요한데, 아래 절차대로 설치한다:


windows환경에 graphviz와 pygraphviz 설치

1. 가상환경(py310)에 들어간다

2. graphviz 툴을 설치한다: https://pygraphviz.github.io/documentation/stable/install.html에 들어가서 다운 받아 설치하거나 또는 https://graphviz.org/download/#windows에가서 다운 받아 설치한다. 

설치할 때, 경로를 "사용자 모두" 또는 "현재 사용자"로 선택

3. graphviz를 설치했으면 pip install graphviz하면 설치됨

4. pygraphviz 설치를 위해서는 visual studio make 도구 설치가 필요함: https://visualstudio.microsoft.com/ko/visual-cpp-build-tools/에 들어가서 Build Tools를 다운로드 하고 설치한다. 7Gb 메모리 필요

5. 설치가 완료되면 재부팅을 한다

6. pygraphviz 설치: https://pygraphviz.github.io/documentation/stable/install.html에 설명된 명령을 참고하여, 

>> pip install --config-settings="--global-option=build_ext" --config-settings="--global-option=-IC:\Program Files\Graphviz\include" --config-settings="--global-option=-LC:\Program Files\Graphviz\lib" pygraphviz

이렇게 하여 설치를 완료 하였음


2025년 1월 7일 화요일

L2 regularization

 DNN학습할 때, 학습 샘플 수가 작을 경우가 많다. 이 때, 모델은 데이터에 과적합된다. 과적합을 피하기 위해 data augmentation이나, dropout등을 적용하면 학습 자체가 잘 되지 않는 일이 발생한다. 

이럴 때 해볼 수 있는 옵션 중에 L2 regularization이 있다. 

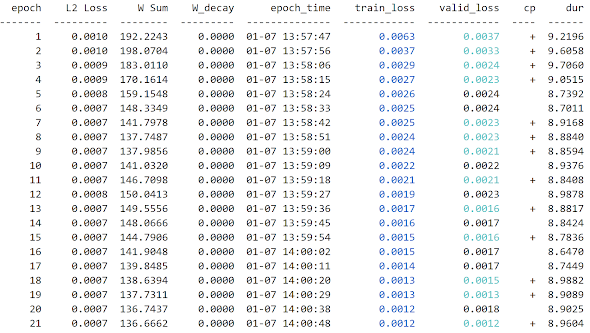
skorch기반으로 다변량 시계열 데이터에 대해 regression학습을 해보면 가중치의 제곱합(Weights Sum)값이 아래와 같다. 


valid_loss는 계속 줄고 있지만, 가중치합이 급격히 증가하고 있다. 즉, 모델이 과적합 되고 있다. 

이번에는 Loss항에 L2 regularization항을 포함시키고, 다시 학습을 시키면 다음과 같다.


W Sum항을 살펴보면 값이 줄고 있고, 범위 내에서 관리되고 있다. 즉, L2 Loss항과 MSE Loss항이 합쳐져서 train_loss값이 된다. 

이 때 L2 Loss의 가중치인 Ramda값의 크기를 잘 결정해 주어야 한다. 

- L2 regularization 적용 시, Weights Sum이 작아짐. 

- L2 loss의 크기가 최적화되었을 때의 train_loss나 valid_loss의 절반 이하가 되게 Weight_decay값을 선정

- 즉, L2 Loss가 원래 Loss의 감소에 영향을 주지 않을 정도로 Ramda값을 정해 준다.


2023년 12월 1일 금요일

timescaledb 사용하기

 1. docker compose 파일 작성

version: "3.8"

services:
  timescaledb:
    image: timescale/timescaledb:latest-pg14
    container_name: timescale
    hostname: timescaledb
    restart: always
    ports:
      - ${TIMESCALEDB_PORT}:5432
    volumes:
      - ./${TIMESCALEDB_DATA_STORE}:/var/lib/postgresql/data
    environment:
      POSTGRES_PASSWORD: ${TIMESCALEDB_PASSWORD}
      POSTGRES_USER: ${TIMESCALEDB_USER}
      POSTGRES_DB: ${TIMESCALEDB_DB}
  adminer:
    image: adminer:4.8.1
    container_name: adminer
    restart: always
    ports:
      - ${ADMINER_PORT}:8080

2. 동일 폴더에 .env파일 작성

# timescaledb
TIMESCALEDB_PORT=5432
TIMESCALEDB_DATA_STORE=timescaledb/
TIMESCALEDB_PASSWORD=timescaledb
TIMESCALEDB_USER=timescale
TIMESCALEDB_DB=timescale_database

# adminer
ADMINER_PORT=8087

3. docker compose up 실행

4. python 코드로 접속 여부 확인

import psycopg2
from pgcopy import CopyManager
# Structure of the connection string:
# "postgres://username:password@host:port/dbname"
CONNECTION = "postgres://timescale:timescaledb@localhost:5432/timescale_database"
conn = psycopg2.connect(CONNECTION)
cursor = conn.cursor()

for id in range(1, 4, 1):
     data = (id,)
     # create random data
     simulate_query = """SELECT generate_series(now() - interval '24 hour', now(), interval '5 minute') AS time,
                        %s as sensor_id,
                        random()*100 AS temperature,
                        random() AS cpu
                     """
     cursor.execute(simulate_query, data)
     values = cursor.fetchall()
     # column names of the table you're inserting into
     cols = ['time', 'sensor_id', 'temperature', 'cpu']
     # create copy manager with the target table and insert
     mgr = CopyManager(conn, 'sensor_data', cols)
     mgr.copy(values)

conn.commit()

5. chrome열어서 localhost:8087 접속하여 table생성 여부 체크

6. docker container ls --all 로 container 체크해서 아래 확인

2b2340a3b640   timescale/timescaledb:latest-pg14   "docker-entrypoint.s…"   7 days ago   Up 7 days   0.0.0.0:5432->5432/tcp   timescale
bc41c6ad6171   adminer:4.8.1                       "entrypoint.sh php -…"   7 days ago   Up 7 days   0.0.0.0:8087->8080/tcp   adminer


[참고] 

1. Postres for time series data, Medium

2023년 5월 30일 화요일

yolov8 학습 및 테스트

# yolov8 설치 후 학습과 테스트의 예


# 경로- g:\2023_yolov8
> yolo task=detect mode=train model=yolov8m.pt imgsz=1280 data=fire2023_1.yaml
epochs=50 batch=16 name=yolov8m_v8_50e
> yolo predict model=best.pt source=parking_lot5.mp4  # test

2023년 5월 9일 화요일

pip가 깨졌을 때

 (1) pip가 깨어졌을 때, base에서

conda install --force-reinstall pip


(2) 아래 오류

ERROR: Could not install packages due to an OSError: [Errno 2] No such file or directory: 

> pip3 install --upgrade --user pip