2026년 2월 25일 수요일

OpenVLA 및 LIBERO 환경 구축

 # OpenVLA 및 LIBERO 환경 구축

- [참고] https://kimelab.notion.site/OpenVLA-LIBERO-24f875de525f813984b9f84b75e5d5fb

- [다운로드]

(1) finetuning version: https://huggingface.co/openvla/openvla-7b-finetuned-libero-spatial/tree/main 의 모든 파일 다운로드

(2) original: https://huggingface.co/openvla/openvla-7b/tree/main


- 연구실의 우분투 서버: /home/vislab/.cache/huggingface/hub/openvla-7b-finetuned-libero-spatial/

            폴더에 학습된 pt파일 및 관련 설정파일, 소스 등이 저장되어 있음

- [실행] ~/Downloads/openvla위치로 가서 

    > xvfb-run -a python experiments/robot/libero/run_libero_eval.py --model_family openvla --pretrained_checkpoint    /home/vislab/.cache/huggingface/hub/openvla-7b-finetuned-libero-spatial/ --task_suite_name libero_spatial --center_crop True --num_trials_per_task 1

- [확인] /home/vislab/Downloads/openvla/rollouts/2026_02_26/ 폴더 위치에 만들어 지는 mp4파일을 열어봄


## Set-up: Conda Env

# Create and activate conda environment

conda create -n openvla python=3.10 -y

conda activate openvla


# CUDA 12.1 (Conda)

conda install pytorch==2.2.0 torchvision==0.17.0 torchaudio==2.2.0 pytorch-cuda=12.1 -c pytorch -c nvidia -y 


## Set-up: Openvla Repo

# Clone and install the openvla repo

git clone https://github.com/openvla/openvla.git

cd openvla

pip install -e .

# openvla pip 설치이후 Pytorch CPU 버전으로 downgrade 현상 체크


## Set-up(for Ubuntu): Ninja & Flash Attention 2

# Install Flash Attention 2 for training (https://github.com/Dao-AILab/flash-attention)

#   =>> If you run into difficulty, try `pip cache remove flash_attn` first

pip install packaging ninja

# ninja --version; echo $?  # Verify Ninja --> should return exit code "0"

# Linux GCC 필수 (윈도우에서는 MSVC 필요) 

pip install "flash-attn==2.5.5" --no-build-isolation


## Inference Test — OpenVLA (Linux & Windows)

- [실행 스크립트] Source code: vla-scripts/extern/verify_openvla.py


# Install — LIBERO

## Clone and install the LIBERO repo

git clone https://github.com/Lifelong-Robot-Learning/LIBERO.git

cd LIBERO

pip install -e .

cd ..


## Install other required packages for OpenVLA

cd openvla

pip install -r experiments/robot/libero/libero_requirements.txt


# Launching LIBERO Evaluations (Only Linux)

## Set-up — 4-bit 양자화 모드

`openvla/experiments/robot/libero` 폴더 > `run_libero_eval.py` 


GenerateConfig 클래스 > `load_in_4bit: bool = False` → `load_in_4bit: bool = True`


# Launch LIBERO-Spatial evals

python experiments/robot/libero/run_libero_eval.py \

  --model_family openvla \

  --pretrained_checkpoint openvla/openvla-7b-finetuned-libero-spatial \

  --task_suite_name libero_spatial \

  --center_crop True


python experiments/robot/libero/run_libero_eval.py --model_family openvla --pretrained_checkpoint openvla/openvla-7b-finetuned-libero-spatial --task_suite_name libero_spatial --center_crop True


# Launch LIBERO-Object evals

python experiments/robot/libero/run_libero_eval.py \

  --model_family openvla \

  --pretrained_checkpoint openvla/openvla-7b-finetuned-libero-object \

  --task_suite_name libero_object \

  --center_crop True


# Launch LIBERO-Goal evals

python experiments/robot/libero/run_libero_eval.py \

  --model_family openvla \

  --pretrained_checkpoint openvla/openvla-7b-finetuned-libero-goal \

  --task_suite_name libero_goal \

  --center_crop True


# Launch LIBERO-10 (LIBERO-Long) evals

python experiments/robot/libero/run_libero_eval.py \

  --model_family openvla \

  --pretrained_checkpoint openvla/openvla-7b-finetuned-libero-10 \

  --task_suite_name libero_10 \

  --center_crop True


2025년 8월 31일 일요일

RAG 시스템 돌리기

[실행 환경] windows11, python=3.10, conda 가상환경, amd 7950x CPU,  64gb main ram, RTX Titan 24Gb GPU


1. llm 모델: Qwen2.5-32B-Instruct-AWQ (Alibaba모델)

- vllm의 직접 실행이 안되어서 docker기반으로 실행

- G:\huggingface_models 폴더 아래에 다운 받은 qwen모델 있음

(testllm) G:\>docker run --gpus all -v G:\huggingface_models:/root/.cache/huggingface -p 8000:8000 --ipc=host -e HUGGING_FACE_HUB_TOKEN=hf_xxxxxxxx vllm/vllm-openai:v0.5.5 --model Qwen/Qwen2.5-32B-Instruct-AWQ --dtype float16 --served-model-name qwen2.5-32b --api-key pnu-vislab --max-model-len 2500 --gpu-memory-utilization 0.95


(option의미)

--gpu-memory-utilization 0.92: gpu메모리(vram) 이용율, 92%까지 gpu메모리 사용 가능

--api-key pnu-vislab: rag_api.py 코드 등에서 이 키를 사용해야 함

HUGGING_FACE_HUB_TOKEN=... : llm모델 다운 가능하려면 huggingface 키를 받아 사용해야 함

--served-model-name qwen2.5-32b: Qwen/Qwen2.5-32B-Instruct-AWQ모델을 사용 중인데 외부에서 refering을 위한 이름


(실행)

INFO 08-31 19:12:37 weight_utils.py:236] Using model weights format ['*.safetensors']

Loading safetensors checkpoint shards:   0% Completed | 0/5 [00:00<?, ?it/s]

Loading safetensors checkpoint shards:  20% Completed | 1/5 [01:36<06:27, 96.96s/it]

Loading safetensors checkpoint shards:  40% Completed | 2/5 [03:17<04:56, 98.87s/it]

.....

다운 받은 파일을 vram에 로드(시간 좀 걸림) 한 후, 오류가 잘 발생하는데, KV(key-value) cache memory부족 오류가 자주 뜸. 

--max-model-len 2500를 1024로 더 줄이고,

--gpu-memory-utilization 0.92를 0.95로 더 늘리고...

현재 모델을 24g vram에서 돌리기에는 빠듯한 느낌


2. 벡터 DB(qdrant) 실행

(testllm) G:\>docker run -d --name qdrant -p 6333:6333 -p 6334:6334 -v G:/qdrant_storage:/qdrant/storage qdrant/qdrant


3. 문서 인덱싱

(testllm) G:\2025\rag_server>python index_documents.py

🚀 테스트 문서 인덱싱 시작

임베딩 모델 로딩 중...

Fetching 30 files: 100%|██████████████| 30/30 [00:00<00:00, 14999.30it/s]

✅ 임베딩 모델 로드 완료

✅ Qdrant 연결 성공

⚠️  기존 컬렉션 'pet_corpus_m3' 발견. 삭제 후 재생성...

✅ 컬렉션 'pet_corpus_m3' 생성 완료

✅ 10개 문서 로드 완료

문서 임베딩 중...

You're using a XLMRobertaTokenizerFast tokenizer. Please note that with a fast tokenizer, using the __call__ method is faster than using a method to encode the text followed by a call to the pad method to get a padded encoding.

진행률: 5/10 - 벡터 차원: 1024

진행률: 10/10 - 벡터 차원: 1024

✅ 10개 포인트 생성 완료

Qdrant에 업로드 중...

✅ 인덱싱 완료: 10개 문서

📊 컬렉션 통계: 10개 포인트

⏱️  총 소요시간: 4.33초


4. RAG_API 서버 시작

(testllm) G:\2025\rag_server>python rag_api.py

G:\2025\rag_server\rag_api.py:65: DeprecationWarning:

        on_event is deprecated, use lifespan event handlers instead.

        Read more about it in the

        [FastAPI docs for Lifespan Events](https://fastapi.tiangolo.com/advanced/events/).

  @app.on_event("startup")

🐾 테스트 케어 RAG API 서버 시작

📖 API 문서: http://localhost:9000/docs

🔍 테스트: curl -X POST http://localhost:9000/chat-rag -H 'Content-Type: application/json' -d '{"question":"강아지 체온이 높을 때 어떻게 해야 하나요?"}'

INFO:     Will watch for changes in these directories: ['G:\\2025\\rag_server']

INFO:     Uvicorn running on http://0.0.0.0:9000 (Press CTRL+C to quit)

INFO:     Started reloader process [17224] using WatchFiles

INFO:     Started server process [40288]

INFO:     Waiting for application startup.

INFO:rag_api:🚀 서버 초기화 시작

INFO:rag_api:임베딩 모델 로딩...

INFO:watchfiles.main:5 changes detected

Fetching 30 files: 100%|████████████████| 30/30 [00:00<00:00, 9983.27it/s]

INFO:FlagEmbedding.finetune.embedder.encoder_only.m3.runner:loading existing colbert_linear and sparse_linear---------

INFO:rag_api:✅ 임베딩 모델 로드 완료

INFO:rag_api:Qdrant 연결 중...

INFO:httpx:HTTP Request: GET http://127.0.0.1:6333 "HTTP/1.1 200 OK"

INFO:httpx:HTTP Request: GET http://127.0.0.1:6333/collections "HTTP/1.1 200 OK"

INFO:httpx:HTTP Request: GET http://127.0.0.1:6333/collections/pet_corpus_m3 "HTTP/1.1 200 OK"

INFO:rag_api:✅ Qdrant 연결 완료 (문서 수: 10)

INFO:rag_api:vLLM 연결 중...

INFO:httpx:HTTP Request: GET http://127.0.0.1:8000/v1/models "HTTP/1.1 200 OK"

INFO:rag_api:✅ vLLM 연결 완료 (사용 가능 모델: ['qwen2.5-32b'])

INFO:rag_api:🎉 서버 초기화 완료!

INFO:     Application startup complete.

INFO:rag_api:질문 받음: 강아지 체온이 높을 때 어떻게 해야 하나요?

You're using a XLMRobertaTokenizerFast tokenizer. Please note that with a fast tokenizer, using the `__call__` method is faster than using a method to encode the text followed by a call to the `pad` method to get a padded encoding.

INFO:httpx:HTTP Request: POST http://127.0.0.1:6333/collections/pet_corpus_m3/points/search "HTTP/1.1 200 OK"

INFO:rag_api:LLM 응답 생성 중...

INFO:httpx:HTTP Request: POST http://127.0.0.1:8000/v1/chat/completions "HTTP/1.1 200 OK"

INFO:rag_api:✅ 응답 생성 완료

INFO:     127.0.0.1:59283 - "POST /chat-rag HTTP/1.1" 200 OK

INFO:httpx:HTTP Request: GET http://127.0.0.1:6333/collections/pet_corpus_m3 "HTTP/1.1 200 OK


5. 실행 예

(testllm) G:\2025\rag_server>curl -X POST http://localhost:9000/chat-rag -H "Content-Type: application/json" -d "{\"question\":\"강아지 체온이 높을 때 어떻게 해야 하나요?\"}"

{"answer":"강아지의 체온이 높을 때, 즉 40도 이상일 경우, 열사병을 의심해야 합니다. 이럴 때는 강아지를 시원한 곳으로 옮기고, 물을 조금씩 먹이도록 합니다. 하지만 이러한 증상이 계속된다면 수의사 상담을 권장드립니다.","sources":[{"text":"강아지의 적정 체온은 38-39도 사이입니다. 체온이 40도 이상이면 열사병을 의심해야 하며, 즉시 시원한 곳으로 옮기고 물을 조금씩 먹여야 합니다.","score":0.7699,"meta":{"category":"건강","species":"강아지"}},{"text":"햄스터는 온도에 민감합니다. 실내 온도는 20-24도가 적당하며, 직사광선과 급격한 온도 변화는 피해야 합니다. 겨울철에는 보온에 특히 신경써야 합니다.","score":0.592,"meta":{"category":"환경","species":"햄스터"}},{"text":"고양이가 구토를 자주 한다면 헤어볼, 식이 알레르기, 또는 소화기 질환을 의심해야 합니다. 하루에 2회 이상 구토하면 수의사 진료를 받으세요.","score":0.5769,"meta":{"category":"건강","species":"고양이"}},{"text":"강아지 치아 관리를 위해서는 주 2-3회 양치질이 필요합니다. 사람용 치약은 절대 사용하지 말고, 반려동물 전용 치약을 사용하세요.","score":0.5598,"meta":{"category":"케어","species":"강아지"}},{"text":"강아지 예방접종은 종합백신(DHPPL), 켄넬코프, 광견병이 기본입니다. 첫 접종은 생후 6-8주, 추가접종은 수의사와 상담하여 결정하세요.","score":0.5527,"meta":{"category":"건강","species":"강아지"}}],"query_info":{"question":"강아지 체온이 높을 때 어떻게 해야 하나요?","results_count":5,"filters_applied":false,"avg_score":0.6102}}


6. 다운된 도커 이미지 확인

(testllm) G:\>docker images

REPOSITORY               TAG        IMAGE ID       CREATED         SIZE

qdrant/qdrant            latest    6ac4807063bb   4 days ago      254MB

vllm/vllm-openai        latest    d731ee65c044   11 days ago     31GB


7. 실행 중인 도커 container 확인

(testllm) G:\huggingface_models>docker container ls

CONTAINER ID   IMAGE                     COMMAND                   CREATED          STATUS          PORTS                              NAMES

f03b00e22ff7   vllm/vllm-openai:v0.5.5   "python3 -m vllm.ent…"   27 seconds ago   Up 27 seconds   0.0.0.0:8000->8000/tcp             admiring_satoshi

d072b9b35f76   qdrant/qdrant             "./entrypoint.sh"         2 days ago       Up 2 days       0.0.0.0:6333-6334->6333-6334/tcp   qdrant


2025년 5월 4일 일요일

Gstreamer와 연결된 opencv 컴파일 방법

(1) gstreamer가 설치된 docker image를 다운받고 이것으로 container진입

docker pull ducksouplab/ubuntu-cuda-gstreamer:ubuntu22.04-cuda11.7.0-gstreamer1.22.0

docker run --gpus all -it ducksouplab/ubuntu-cuda-gstreamer:ubuntu22.04-cuda11.7.0-gstreamer1.22.0 /bin/bash


(2) opencv, opencv_contrib의 소스를 다운 받음

mkdir -p /opencv/src && cd /opencv/src

wget -O opencv.zip https://github.com/opencv/opencv/archive/4.7.0.zip

wget -O opencv_contrib.zip https://github.com/opencv/opencv_contrib/archive/4.7.0.zip

unzip opencv.zip && unzip opencv_contrib.zip


(3) build폴더 만듬

cd /opencv

rm -rf build

mkdir build && cd build


(4) PKG_CONFIG_PATH 초기화 (필수)

unset PKG_CONFIG_PATH


(5) cmake 구성

# 이대로 복사하면 실행 안됨. chatgpt에 넣고 다시 생성

# 당연히 src는 다 받아 놓은 상태여야

cmake -D CMAKE_BUILD_TYPE=Release \

  -D CMAKE_INSTALL_PREFIX=/usr/local \

  -D OPENCV_EXTRA_MODULES_PATH=../src/opencv_contrib-4.7.0/modules \

  -D WITH_GSTREAMER=ON \

  -D WITH_CUDA=ON \

  -D ENABLE_FAST_MATH=1 \

  -D CUDA_FAST_MATH=1 \

  -D WITH_CUBLAS=1 \

  -D WITH_V4L=ON \

  -D WITH_OPENGL=ON \

  -D BUILD_opencv_python3=ON \

  -D PYTHON3_EXECUTABLE=$(which python3) \

  -D PYTHON3_INCLUDE_DIR=$(python3 -c "from sysconfig import get_paths as gp; print(gp()['include'])") \

  -D PYTHON3_LIBRARY=$(python3 -c "from sysconfig import get_config_var; print(get_config_var('LIBDIR'))")/libpython3.10.so \

  -D BUILD_EXAMPLES=OFF ../src/opencv-4.7.0


(6) make 실행

make -j$(nproc)


(7) install 실행

make install

ldconfig


(8) 설치 확인 및 GStreamer 체크: gstreamer가 yes인지 체크

python3 -c "import cv2; print(cv2.__version__); print(cv2.getBuildInformation())"


(9) container를 이미지화

sudo docker ps -a

sudo docker commit 7b2450127c68 opencv-gst-cuda-v2:latest   # 여기서 만듬

sudo docker images

sudo docker run --gpus all -it opencv-gst-cuda-v2:latest /bin/bash


(10) Docker Hub 업로드

docker ps -a

sudo docker login -u 도커id  # 비번넣어야

sudo docker tag opencv-gst-cuda-v2:latest funmv/opencv-gst-cuda-v2:latest

sudo docker push funmv/opencv-gst-cuda-v2:latest


2025년 2월 13일 목요일

FSM (유한상태기계) 사용 해보기

transitions라는 pypi 라이브러리가 있어서 사용해 보았음. 계층 구조의 transition도 표현해주고 기능이 풍부함.

작성된 상태도를 그려보기 위해서는 pygraphviz설치가 필요한데, 아래 절차대로 설치한다:


windows환경에 graphviz와 pygraphviz 설치

1. 가상환경(py310)에 들어간다

2. graphviz 툴을 설치한다: https://pygraphviz.github.io/documentation/stable/install.html에 들어가서 다운 받아 설치하거나 또는 https://graphviz.org/download/#windows에가서 다운 받아 설치한다. 

설치할 때, 경로를 "사용자 모두" 또는 "현재 사용자"로 선택

3. graphviz를 설치했으면 pip install graphviz하면 설치됨

4. pygraphviz 설치를 위해서는 visual studio make 도구 설치가 필요함: https://visualstudio.microsoft.com/ko/visual-cpp-build-tools/에 들어가서 Build Tools를 다운로드 하고 설치한다. 7Gb 메모리 필요

5. 설치가 완료되면 재부팅을 한다

6. pygraphviz 설치: https://pygraphviz.github.io/documentation/stable/install.html에 설명된 명령을 참고하여, 

>> pip install --config-settings="--global-option=build_ext" --config-settings="--global-option=-IC:\Program Files\Graphviz\include" --config-settings="--global-option=-LC:\Program Files\Graphviz\lib" pygraphviz

이렇게 하여 설치를 완료 하였음


2025년 1월 7일 화요일

L2 regularization

 DNN학습할 때, 학습 샘플 수가 작을 경우가 많다. 이 때, 모델은 데이터에 과적합된다. 과적합을 피하기 위해 data augmentation이나, dropout등을 적용하면 학습 자체가 잘 되지 않는 일이 발생한다. 

이럴 때 해볼 수 있는 옵션 중에 L2 regularization이 있다. 

skorch기반으로 다변량 시계열 데이터에 대해 regression학습을 해보면 가중치의 제곱합(Weights Sum)값이 아래와 같다. 


valid_loss는 계속 줄고 있지만, 가중치합이 급격히 증가하고 있다. 즉, 모델이 과적합 되고 있다. 

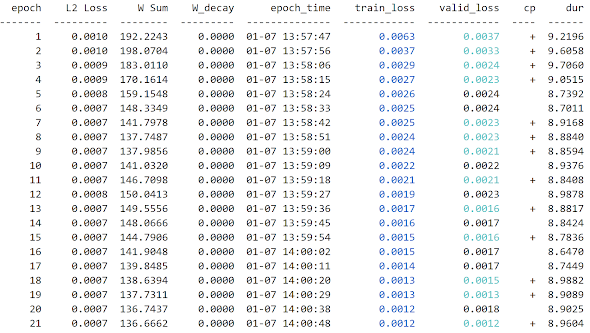
이번에는 Loss항에 L2 regularization항을 포함시키고, 다시 학습을 시키면 다음과 같다.


W Sum항을 살펴보면 값이 줄고 있고, 범위 내에서 관리되고 있다. 즉, L2 Loss항과 MSE Loss항이 합쳐져서 train_loss값이 된다. 

이 때 L2 Loss의 가중치인 Ramda값의 크기를 잘 결정해 주어야 한다. 

- L2 regularization 적용 시, Weights Sum이 작아짐. 

- L2 loss의 크기가 최적화되었을 때의 train_loss나 valid_loss의 절반 이하가 되게 Weight_decay값을 선정

- 즉, L2 Loss가 원래 Loss의 감소에 영향을 주지 않을 정도로 Ramda값을 정해 준다.


2023년 12월 1일 금요일

timescaledb 사용하기

 1. docker compose 파일 작성

version: "3.8"

services:
  timescaledb:
    image: timescale/timescaledb:latest-pg14
    container_name: timescale
    hostname: timescaledb
    restart: always
    ports:
      - ${TIMESCALEDB_PORT}:5432
    volumes:
      - ./${TIMESCALEDB_DATA_STORE}:/var/lib/postgresql/data
    environment:
      POSTGRES_PASSWORD: ${TIMESCALEDB_PASSWORD}
      POSTGRES_USER: ${TIMESCALEDB_USER}
      POSTGRES_DB: ${TIMESCALEDB_DB}
  adminer:
    image: adminer:4.8.1
    container_name: adminer
    restart: always
    ports:
      - ${ADMINER_PORT}:8080

2. 동일 폴더에 .env파일 작성

# timescaledb
TIMESCALEDB_PORT=5432
TIMESCALEDB_DATA_STORE=timescaledb/
TIMESCALEDB_PASSWORD=timescaledb
TIMESCALEDB_USER=timescale
TIMESCALEDB_DB=timescale_database

# adminer
ADMINER_PORT=8087

3. docker compose up 실행

4. python 코드로 접속 여부 확인

import psycopg2
from pgcopy import CopyManager
# Structure of the connection string:
# "postgres://username:password@host:port/dbname"
CONNECTION = "postgres://timescale:timescaledb@localhost:5432/timescale_database"
conn = psycopg2.connect(CONNECTION)
cursor = conn.cursor()

for id in range(1, 4, 1):
     data = (id,)
     # create random data
     simulate_query = """SELECT generate_series(now() - interval '24 hour', now(), interval '5 minute') AS time,
                        %s as sensor_id,
                        random()*100 AS temperature,
                        random() AS cpu
                     """
     cursor.execute(simulate_query, data)
     values = cursor.fetchall()
     # column names of the table you're inserting into
     cols = ['time', 'sensor_id', 'temperature', 'cpu']
     # create copy manager with the target table and insert
     mgr = CopyManager(conn, 'sensor_data', cols)
     mgr.copy(values)

conn.commit()

5. chrome열어서 localhost:8087 접속하여 table생성 여부 체크

6. docker container ls --all 로 container 체크해서 아래 확인

2b2340a3b640   timescale/timescaledb:latest-pg14   "docker-entrypoint.s…"   7 days ago   Up 7 days   0.0.0.0:5432->5432/tcp   timescale
bc41c6ad6171   adminer:4.8.1                       "entrypoint.sh php -…"   7 days ago   Up 7 days   0.0.0.0:8087->8080/tcp   adminer


[참고] 

1. Postres for time series data, Medium

2023년 5월 30일 화요일

yolov8 학습 및 테스트

# yolov8 설치 후 학습과 테스트의 예


# 경로- g:\2023_yolov8
> yolo task=detect mode=train model=yolov8m.pt imgsz=1280 data=fire2023_1.yaml
epochs=50 batch=16 name=yolov8m_v8_50e
> yolo predict model=best.pt source=parking_lot5.mp4  # test

2023년 5월 9일 화요일

pip가 깨졌을 때

 (1) pip가 깨어졌을 때, base에서

conda install --force-reinstall pip


(2) 아래 오류

ERROR: Could not install packages due to an OSError: [Errno 2] No such file or directory: 

> pip3 install --upgrade --user pip

2023년 5월 2일 화요일

python 패턴

 객체 주입 후 한번에 실행하기

from abc import ABC, abstractmethod
from typing import List, Tuple, Union, Dict
import torch


# Base class for creating ts analytic items
# classmethod는 staticmethod와 유사한데, staticmethod는 class변수에 access
# 안 하는데 비해, classmethod는 cls로 access한다.
class ItemBase(ABC):
    @classmethod  # instance 관점이 아닌 class전체 관점에서 변수를 다룰 수 있음
    def add_instance(cls, ins):  # class의 보편적인 값을 다룬다는 의미에서 class
        cls._items.append(ins)  # 약자인 cls를 인자로 받음.
        print(cls._items, len(cls._items))  # self대신 cls전달 받음
       
    @abstractmethod
    def run(self, *args):
        pass
   
   
# Derivated class for outlier detection
# 생성만 하면 객체 리스트가 자동으로 만들어짐
class OutlierDetector(ItemBase):
    _items = []  # ItemBase에 있었다면 모든 자식의 instance를 저장
    def __init__(self, *args):  # 여기에 있으면, 현 class 인스턴스 저장
        print(args)
        self.add_instance(self)
       
    def run(self, *args):
        print(args)
       

# Derivated class for forecasting time series
class Forecastor(ItemBase):
    _items = []
    def __init__(self, *args):
        super().__init__()
        print(args)
        self.add_instance(self)
       
    def run(self, *args):
        print(args)

       
# Collect multiple items and process them at once
class ProcessItems(object):
    def __init__(self, items: List = [])->None:
        self.items = items
       
    def process(self)->List:
        res = []
        for item in self.items:
            res.append(item.run())
        return res
           
       
a3 = ProcessItems([OutlierDetector(), Forecastor()])
res = a3.process()
print(res)


응용 예

from abc import ABC, abstractmethod
from typing import List, Tuple, Union, Dict
import torch
import pdb


# Base class for creating ts(Time sereis) analytic items
class ItemBase(ABC):
    _modes = ['start', 'stable', 'finish']
   
    @abstractmethod
    def run(self, *args):
        pass
   
    # cls로 class변수에 access 가능(staticmethod와 차이점)
    @classmethod
    def _load_weight(cls, items):
        cls.models = {}
        for key, weight in items.items():
            if key not in cls._modes:
                assert False, 'Mode Error!!'
            # cls.models[key] = cls.dnn_model(weight)  
            cls.models[key] = None    
   
# Child class for forecasting time series
class Forecastor(ItemBase):
    def __init__(self, items):
        # self.dnn_model = dnn_model()
        self._load_weight(items)
       
    def run(self, *args):
        batch, mode = args
        # outs = self.models[mode].predict(batch)
        print(batch.shape)
        return batch.shape

# Child class for outlier detection
class AnomalyDetector(ItemBase):
    def __init__(self, items):
        # self.dnn_model = dnn_model()
        self._load_weight(items)
       
    def run(self, *args):
        batch, mode = args
        print(batch.shape)
        return batch.shape

# Main processor to run all items
class Processor(object):
    def __init__(self, items):
        self.items = items
       
    def process(self, ts):
        res = []
        # mode = ts_decision(ts)  # 기동,정상,정지부 판정
        mode = 'start'
        for item in self.items:
            outs = item.run(ts, mode)
            res.append(outs)
        return res


# There are two local processes to handle time series data
forecast = Forecastor({'start':'m1.pt', 'stable': 'm2.pt', 'finish': 'm3.pt'})
anodetec = AnomalyDetector({'start':'m1.pt', 'stable': 'm2.pt', 'finish': 'm3.pt'})
batch = torch.rand(8,32,16)

# If you need to add another process, first define and simply add it to arg list
a1 = Processor([forecast, anodetec])
a1.process(batch)
                torch.Size([8, 32, 16])
                torch.Size([8, 32, 16])
Out[7]:
[torch.Size([8, 32, 16]), torch.Size([8, 32, 16])]

from abc import ABC, abstractmethod
from typing import List, Tuple, Union, Dict
import numpy as np
import torch
import pdb

def _gt(x,v): return True if x >= v else False  # _gt = lambda x, v: True if x >= v else False
def _lt(x,v): return True if x <= v else False  # _lt = lambda x, v: True if x <= v else False
def _eq(x,v): return True if x == v else False  # _eq = lambda x, v: True if x == v else False
def _in(x,v1,v2): return True if (x >= v1) & (x<= v2) else False  # _in = lambda x, v1, v2: True if (x >= v1) & (x<= v2) else False

op1={}
op1['s1'] = _gt
_gt(2,1), _lt(2,1), _in(2,3,4), op1['s1'](2,1)
(True, False, False, True)


# Base class for creating ts(Time sereis) analytic items
class ItemBase(ABC):
    @classmethod
    def add(cls, ins):
        cls._items[ins._name] = ins
       
    @classmethod
    def get_items(cls):
        return list(cls._items.keys())
   
    @classmethod
    def get_conditions(cls):
        items = []
        for k, v in cls._items.items():
            iks = [(ik, str(iv[0]).split()[1]) for ik,iv in v.terms.items()]
            items.append({k: iks})
        return items
   
    def _save_items(self, items):
        if type(items) != dict:
            return None
        for k,v in items.items():
            try:
                self.terms[k] = v
            except Exception as e:
                return None
   
    def refresh(self, ins):
        keys = self.terms.keys()
        satisfied = {}
        for k, v in ins.items():
            if k in keys:
                try:
                    check = self.terms[k][0](*v)
                except:
                    satisfied[k] = -1
                else:
                    self.terms[k][1] = check
                    satisfied[k] = check
        return satisfied    

class Derivated(ItemBase):
    class NoneDict(Dict):
        def __getitem__(self, key):
            return dict.get(self, key)
       
    _items = NoneDict()
   
    def __init__(self, _name, items):
        self.terms = {}
        self._name = _name
        self._save_items(items)


Derivated.add(Derivated('NOx', {'op1':[_gt, False], 'op2': [_lt, False], 'op3': [_in, False]}))
Derivated.add(Derivated('O2', {'op4':[_lt, False], 'op5': [_in, False]}))

if Derivated._items['NOx']:
    print(Derivated._items['NOx'].refresh({'op1': (1,2), 'op2': (3,4), 'op3': (4,1,5)}))
if Derivated._items['O2']:
    print(Derivated._items['O2'].refresh({'op4': (1,2), 'op2': (3,4), 'op3': (4,1,5)}))
{'op1': False, 'op2': True, 'op3': True}
{'op4': True}


Derivated.add(Derivated('NOxIn', {'op1':[_gt, False], 'op2': [_lt, False], 'op3': [_in, False]}))
Derivated.add(Derivated('O2out', {'op4':[_lt, False], 'op5': [_in, False]}))
Derivated.get_items()
['NOx', 'O2', 'NOxIn', 'O2out']


Derivated.get_conditions()
[{'NOx': [('op1', '_gt'), ('op2', '_lt'), ('op3', '_in')]},
 {'O2': [('op4', '_lt'), ('op5', '_in')]},
 {'NOxIn': [('op1', '_gt'), ('op2', '_lt'), ('op3', '_in')]},
 {'O2out': [('op4', '_lt'), ('op5', '_in')]}]


[References]

1. D:\2022\Pattern_Test


2023년 3월 26일 일요일

Pytorch forecasting 사용법

위치: D:\2023\TemporalFusionTransformer

설치 방법 (가상환경 torch310) 

pip install pytorch-lightning
pip install pytorch_forecasting
# version < 2.0 for torch gpu version
# 2023년 3월. torch 2.0을 지원하지 않아, gpu버전 사용을 위해 따로 torch 설치
# numpy버전 맞지 않아 재 설치로 오류 해결  
pip install torch==1.13.1+cu117 torchvision==0.14.1+cu117 torchaudio==0.13.1
--extra-index-url https://download.pytorch.org/whl/cu117
pip install numpy<1.24  # Solve version collision


import numpy as np
import pandas as pd
from pytorch_forecasting import Baseline, TemporalFusionTransformer, TimeSeriesDataSet

sample_data = pd.DataFrame(
    dict(
        time_idx=np.tile(np.arange(6), 3),
        target=np.array([0,1,2,3,4,5,20,21,22,23,24,25,40,41,42,43,44,45]),
        group=np.repeat(np.arange(3), 6),
        holidays = np.tile(['X','Black Friday', 'X','Christmas','X', 'X'],3),
    )
)
sample_data

# group이 3개(0, 1, 2), holidays는 각 group에 대해 일정
# time_index는 첫 col에 주어짐.
time_idx    target  group   holidays
0   0   0   0   X
1   1   1   0   Black Friday
2   2   2   0   X
3   3   3   0   Christmas
4   4   4   0   X
5   5   5   0   X
6   0   20  1   X
7   1   21  1   Black Friday
8   2   22  1   X
9   3   23  1   Christmas
10  4   24  1   X
11  5   25  1   X
12  0   40  2   X
13  1   41  2   Black Friday
14  2   42  2   X
15  3   43  2   Christmas
16  4   44  2   X
17  5   45  2   X
#----------------------------------------------------

# create the time-series dataset from the pandas df
dataset = TimeSeriesDataSet(
    sample_data,
    group_ids=["group"],
    target="target",
    time_idx="time_idx",
    max_encoder_length=2,
    max_prediction_length=3,
    time_varying_unknown_reals=["target"],
    static_categoricals=["holidays"],
    target_normalizer=None
)

# pass the dataset to a dataloader
dataloader = dataset.to_dataloader(batch_size=1)

#load the first batch
x, y = next(iter(dataloader))
print(x['encoder_target'])
print(x['groups'])
print(x['decoder_target'])

# 2개의 값을 encoder로 이용. 3개의 값이 prediction
tensor([[21., 22.]])
tensor([[1]])
tensor([[23., 24., 25.]])
#----------------------------------------------------


가구별 전력량 예측용 데이터의 경우

max_prediction_length = 24  # 이전 7일을 보고 1일 후를 예측
max_encoder_length = 7*24
# 마지막 하루(24시간) 빼고 학습
training_cutoff = time_df["hours_from_start"].max() - max_prediction_length

training = TimeSeriesDataSet(
    time_df[lambda x: x.hours_from_start <= training_cutoff],
    time_idx="hours_from_start",
    target="power_usage",
    group_ids=["consumer_id"],  # group이 여러개
    min_encoder_length=max_encoder_length // 2,
    max_encoder_length=max_encoder_length,
    min_prediction_length=1,
    max_prediction_length=max_prediction_length,
    static_categoricals=["consumer_id"],  # 고객 id는 불변
    time_varying_known_reals=["hours_from_start","day","day_of_week", "month", 'hour'],
    time_varying_unknown_reals=['power_usage'],
    # 정규화하기 전에 softplus변환 후에 정규화 실행(log/logp1/logit/relu등 있음)
    # 각 group별로 정규화. group이 여러개 있고, 크기 범위가 다르다.
    target_normalizer=GroupNormalizer(
        groups=["consumer_id"], transformation="softplus"
    ),  # we normalize by group
    add_relative_time_idx=True,
    add_target_scales=True,
    add_encoder_length=True,
)

validation = TimeSeriesDataSet.from_dataset(training, time_df,
predict=True, stop_randomization=True)

# create dataloaders for  our model
batch_size = 64
# to_dataloader를 통해, torch의 dataloader처럼 동작함
# if you have a strong GPU, feel free to increase the number of workers  
train_dataloader = training.to_dataloader(train=True, batch_size=batch_size, num_workers=0)
val_dataloader = validation.to_dataloader(train=False, batch_size=batch_size * 10, num_workers=0)


[References]

1. Medium blog TFT: https://towardsdatascience.com/temporal-fusion-transformer-time-series-forecasting-with-deep-learning-complete-tutorial-d32c1e51cd91

2. [2023년 4월]

-XGBoost, LightGBM: https://www.youtube.com/watch?v=4Jz4_IOgS4c

-WRN 코드: https://github.com/creinders/ChimeraMix/tree/main/models

-데이터 분석-클리닝: https://double-d.tistory.com/m/14

-데이터 정제와 정규화-사이킷런 기초: https://cyan91.tistory.com/m/40

-Data cleaning in 5 easy steps+Examples: 

https://www.iteratorshq.com/blog/data-cleaning-in-5-easy-steps/

-우리가 pytorch lightning을 써야 하는 이유: 

https://baeseongsu.github.io/posts/pytorch-lightning-introduction/

-트랜스포머 이해 굿: https://www.youtube.com/watch?v=AA621UofTUA

-OpenRefine 툴: https://www.youtube.com/watch?v=nORS7STbLyk / https://www.youtube.com/watch?v=oRH-1RG8oQY

-TFT 적용 예제: https://github.com/IKKIM00/stock-and-pm2.5-prediction-using-TFT / https://dacon.io/competitions/official/235736/data


Pandas 사용법

 위치: D:\2023\TemporalFusionTransformer

# index_col: 원하는 col을 index로 지정하여 불러오기(첫 col을 index로)
data = pd.read_csv('LD2011_2014.txt', index_col=0, sep=';', decimal=',')
# series나 df를 datetime객체로 변환:
#             따라서 여기서는 index이면서, datetime임(2가지 속성)
data.index = pd.to_datetime(data.index)
data.sort_index(inplace=True)
data.head(5)


# resampling후 np.nan값은 0.으로.
data = data.resample('1h').mean().replace(0., np.nan)
earliest_time = data.index.min()
df=data[['MT_002', 'MT_004', 'MT_005', 'MT_006', 'MT_008' ]]

df_list = []
for label in df:
    # (1) index는 MT_002 col추출 시 자동으로 함께 추출(index이므로)
    # (2) index는 datetime이므로 date, time도 추출 가능
    #     ts.index.date(날짜), ts.index.time(시간) 등.
    ts = df[label]

    # ffill(front fill: 앞값으로 채움), bfill(back fill: 뒷값으로 채움)
    start_date = min(ts.fillna(method='ffill').dropna().index)
    end_date = max(ts.fillna(method='bfill').dropna().index)

    # 필요한 data 부분을 slicing하기 위해 activae_range영역을 만듬.
    # True가 되는 부분만 slicing됨. Na, NaN이 아닌 값만 추출됨
    active_range = (ts.index >= start_date) & (ts.index <= end_date)
    ts = ts[active_range].fillna(0.)

    tmp = pd.DataFrame({'power_usage': ts})
    date = tmp.index

    # 전력 사용량은 시간 factor가 중요함
    tmp['hours_from_start'] = (date - earliest_time).seconds / 60 / 60 + (date - earliest_time).days * 24
    tmp['hours_from_start'] = tmp['hours_from_start'].astype('int')
    tmp['days_from_start'] = (date - earliest_time).days
    tmp['date'] = date
    tmp['consumer_id'] = label
    tmp['hour'] = date.hour
    tmp['day'] = date.day
    tmp['day_of_week'] = date.dayofweek
    tmp['month'] = date.month

    #stack all time series vertically
    df_list.append(tmp)

time_df = pd.concat(df_list).reset_index(drop=True)

# match results in the original paper
time_df = time_df[(time_df['days_from_start'] >= 1096)
                & (time_df['days_from_start'] < 1346)].copy()


# building cluster based on kmeans
CLUSTER = {
    0: [19, 20, 21, 49, 50, 51],
    1: [1, 5, 9, 34],
    2: [4, 10, 11, 12, 28, 29, 30, 36, 40, 41, 42, 59, 60],
    3: [2, 3, 6, 7, 8, 13, 14, 15, 16, 17, 18, 22, 23, 24, 25, 26, 27, 31, 32, 33, 35, 37, 38, 39, 43, 44, 45, 46, 47, 48, 52, 53, 54, 55, 56, 57, 58],
}

# assing cluster number to building
for k, nums in CLUSTER.items():
    # df.num.isin(nums): 현재 df.num값이 [19,20,21,...]에 있으면 T, else F.
    # df.loc[~ ~, 'cluster']: 행 index위치에 T, F를 넣으면 T인 경우만 선택됨
    df.loc[df.num.isin(nums), 'cluster'] = k


# FEATURE: `hot` flag when the next day is holiday
# shift(-1): 위로 한칸 밀기. fillna(0): Na, NaN은 0으로.
hot = df.groupby('date').first()['holiday'].shift(-1).fillna(0).astype(int)
#hot = hot.to_frame().reset_index().rename({'holiday': "hot"}, axis=1)
#df = df.merge(hot, on='date', how='left')

# (1) 앞연산으로 동일값이 반복되는 row가 많아 나오면
# (2) first()에 의해 첫번째 row 만 추출
df.groupby('date').first()  


hot = df.groupby('date').first()['holiday'].shift(-1).fillna(0).astype(int)
# to_frame(): series를 df로, reset_index: 맨 앞에 순서 0,1,2,...를 index로 붙여줌
hot = hot.to_frame().reset_index().rename({'holiday': "hot"}, axis=1)


[Reference] 


2023년 3월 7일 화요일

Windows에 도커 설치

 (1) WSL 설치

powershell을 관리자 권한으로 열고,


# Windows SubSystem Linux를 활성화시키는 명령어

> dism.exe /online /enable-feature /featurename:Microsoft-Windows-Subsystem-Linux /all /norestart

# VirtualMachinePlatform 기능을 활성화시키는 명령어 : WSL2 버전에 필요한 명령어

> dism.exe /online /enable-feature /featurename:VirtualMachinePlatform /all /norestart


설치 완료 후 재부팅


(2) Docker Desktop for Windows 다운로드 후 설치

Installer를 다운로드하여 설치하고, 활성화 시키기 위해서는

"Docker desktop" 아이콘을 실행 시켜야 함


(3) 간단한 예제 실행

> docker run -it ubuntu bash


참고

1. 도커 설치: https://axce.tistory.com/121

2. wsl 설치: https://axce.tistory.com/110?category=1030982

BentoML 사용법 요약

> D:\2023\poop_wrn로 이동


bentoml serve service:svc --port 3010 --reload   # bentoml 서비스 실행
locust --headless -u 100 -r 1000 --run-time 1m
--host http://127.0.0.1:3010  # stress test, locustfile.py필요
bentoml build    # bentofile.yaml 필요
bentoml list   # 생성된 bento 확인
bentoml serve poopup_demo:latest
--production --port 3010   # nox39에서 실패 후, 관리자 모드로 다시 창 열어 성공
bentoml containerize poopup_demo:latest  # docker image 생성
docker run -it --rm -p 3015:3000 --gpus all poopup_demo:ov37ue65xqb4
serve --production  # docker 서비스 시작
docker save -o poopup.tar poopup_demo:~~  # docker image의 hdd저장
docker load -i poopup.tar  # docker image의 재 로드

도커 실행 명령

> docker inspect <container-id>
...
"MergedDir":~,
"UpperDir":~,  # 여기 경로에 jpg파일이 저장
"WorkDir":~
...
# docker 실행(container 생성) 시,
> docker run -it --rm -p 30xx:3000 poopup_demo:kb2~~ serve --production
> docker exec -it <container-id> /bin/bash
>> cd src  # 여기에서 jpg파일 확인 가능


1. windows에서는 set 명령으로 환경변수를 볼 수 있으며, BENTOML_HOME=d:\2023으로 설정된 것 확인 가능

> set 

2. DNN학습->Bento 생성->Docker 이미지 생성의 순으로 진행됨. 

> bentoml build  # Bento파일 생성

> bentoml containerize <bentofile:tag>

3. Bento파일 생성 시에, bentofile.yaml 설정파일 사용. Custom docker를 위해서 bentofile.yaml에 지정된 Dockerfile.template 사용

{% extends bento_base_template %}
{% block SETUP_BENTO_BASE_IMAGE %}
{{ super() }}
{% endblock %}

{% set bento__user = "poop" %}
{% set bento__home = "/home/" ~  bento__user %}
{% set bento__path = "/home/" ~ bento__user ~ "/bento" %}
{% set bento__uid_gid = 1000 %}  

{% block SETUP_BENTO_COMPONENTS %}
{{ super() }}
{% endblock %}

4. 생성된 Bento파일(BENTNML_HOME 아래)의 해당 경로에 만들어진 Dockerfile을 봐서 Dockerfile.template 적용 확인 

5. Bento 파일을 이용하여 Docker 이미지 생성

> bentoml containerize poopup_demo:latest

6. 컨테이너 실행

> docker run --user poop -it --rm -p 3010:3000 --gpus all poopup_demo:leo2pupckkeizqb4 serve --production

# --------------- service.py -------------------------------------------
from __future__ import annotations
import typing as t
from typing import TYPE_CHECKING
from torchvision import transforms
import numpy as np
from PIL.Image import Image as PILImage

import bentoml
from bentoml.io import Image
from bentoml.io import NumpyNdarray


if TYPE_CHECKING:
    from numpy.typing import NDArray

poop_runner = bentoml.models.get("poopup:latest").to_runner()
svc = bentoml.Service(name="poopup_demo", runners=[poop_runner])

xforms = transforms.Compose([
        transforms.Resize(256),
        transforms.CenterCrop(224),
        transforms.ToTensor(),
        transforms.Normalize([0.485, 0.456, 0.406], [0.229, 0.224, 0.225])
    ])

def to_numpy(tensor):
    return tensor.detach().cpu().numpy()


@svc.api(input=Image(), output=NumpyNdarray(dtype="int64"))
async def predict_image(f: PILImage) -> "np.ndarray[t.Any, np.dtype[t.Any]]":
    assert isinstance(f, PILImage)

    img = np.expand_dims(xforms(f), 0)
    output_tensor = await poop_runner.async_run(img)
    # print(output_tensor, type(output_tensor))
    return output_tensor.detach().cpu().numpy()

2023년 2월 15일 수요일

OPC UA python 연동

 ** OPC UA python 테스트 ** 

0. python으로 OPC UA의 서버-클라이언트 통신을 테스트한다
1. https://dibrary.tistory.com/39 (서버부) 참고해서 실행
   -단, 통신 포트를 4842에서 안되서 12346으로 해서 성공하였음
2. 아래 UaExpert 설치하여 서버에서 발생하는 데이터를 모니터링 할 수 있음
   -OPC UA python용어들에 대한 설명은 https://red-nose-cousin.tistory.com/4 참고함.
3. https://dibrary.tistory.com/38 (Client부) 참고해서 서버에서 오는 신호를 확인 가능


** UaExpert 설치 **

0. UaExpert는 OPC UA python의 서버 부분 실행 후에, 발생하는 데이터를 모니터링하는 툴
2. 회원 가입함
3. Download -> OPC UA Clients -> UaExpert를 다운로드
4. Windows10에 설치 후, 실행
매뉴얼의 12~15페이지 참고.

- UaExpert실행->Project>Server선택후 마우스 우클릭 'Add'선택->Local마우스 우클릭 후 Edit Discovery URL선택->IP와 Port number입력


# Server부 프로그램

import time
from opcua import Server

server = Server()

url = "opc.tcp://127.0.0.1:12346"
server.set_endpoint(url)

name = "OPCUA_SIMULATION_SERVER"
addspace = server.register_namespace(name)
node = server.get_objects_node()

param1 = node.add_object(addspace, "251-AM-001")
param2 = node.add_object(addspace, "251-AM-002")

normal_operation1 = param1.add_variable("ns=1; s=1630AT155-NO", "normal_operation", 0)
normal_operation2 = param2.add_variable("ns=2; i=34", "test_node", 12)
normal_operation2.set_writable()
normal_operation1.set_writable()

server.start()


# Client부 프로그램

from opcua import Client
import time

url = "opc.tcp://127.0.0.1:12346"
client = Client(url)
client.connect()

cnt = 0
while cnt <= 2:
    normal = client.get_node("ns=1; s=1630AT155-NO")
    print(normal.get_value())
    time.sleep(2)
    normal.set_value(22)
    print(normal.get_value())
    time.sleep(4)
    cnt += 1

cnt = 0
while cnt <= 2:
    normal = client.get_node("ns=2; i=34")
    print(normal.get_value())
    time.sleep(2)
    normal.set_value(12346)
    print(normal.get_value())
    time.sleep(4)
    cnt += 1


[References]


2023년 2월 13일 월요일

MySQL 사용법

 [Windows에서 MySQL 사용법]

Docker 설치 후, mysql를 pull하여 image 다운 후 실행

> docker run --name mysql_test -e MYSQL_ROOT_PASSWORD=1234 -d
-p 3306:3306 mysql:latest
> docker exec -it ee18155087ae /bin/bash
# mysql -u root -p

ERROR 2002 (HY000): Can't connect to local MySQL server through socket '/var/run/mysqld/mysqld.sock' (2)

: 에러 메세지 나옴

> docker ps -a
ee18155087ae   mysql:latest      "docker-entrypoint.s…"   5 minutes ago   Exited (0) 7 seconds ago mysql-container
598d87a1bddc   mysql             "docker-entrypoint.s…"   8 days ago      Exited (255) 41 hours ago 0.0.0.0:3306->3306/tcp, 33060/tcp   mysql_test
....

이미 실행된 후 정지된 container있음(port 3306번을 이미 물고 있어서 오류가 남).

실행 중인 container 모두 정지 후, 기존 container 제거.

> docker stop ee18155087ae  # 실행 중인 container들 정지
> docker rm -f 598d87a1bddc  # 기존 container 제거
> docker restart ee18155087ae  # 재시작
...
# mysql -u root -p

비번 1234 넣으니 정상 실행 되며, mysql> prompt로 들어감


db생성하고, 생성된 db 선택 후, table 생성. data를 몇 개 삽입.

mysql> create database opentutorials;  # db생성
mysql> drop database opentutorials;  # db제거
mysql> show databases;  # db보기
mysql> use opentutorials;  # db선택
mysql> create table topic(  # ";" 안 넣으면 ->로 넘어감
      ->     id int(11) not null auto_increment,
      ->     title varchar(100) not null,
      ->     description text null,
      ->     created datetime not null,
      ->     author varchar(30 null,
      ->     profile varchar(100) null,
      ->     primary key(id));
mysql> show tables;  # 생성 table 확인
mysql> desc topic;  # 입력 속성 확인(description)
mysql> insert into topic (title,description,created,author,profile)
values('mysql','mysql is ...',NOW(),'kdj','developer');
mysql> select * from topic;  # 삽입된 데이터 확인
mysql> insert into topic (title,description,created,author,profile)
values('oracle','oracle is ...',NOW(),'egoing','developer');
mysql> select * from topic;
mysql> insert into topic (title,description,created,author,profile)
values('postgresql','postgresql is ...',NOW(),'egoing','data scientist, developer');
mysql> insert into topic (title,description,created,author,profile)
values('mongdb','mongodb is ...',NOW(),'egoing','developer');

일부 data만 선택하여 확인해 보기

mysql> select id,title,created,author from topic;  # 일부 속성만 선택해 data확인
# author지정 data 선택 / 순서까지 지정 / 건수도 지정
mysql> select id,title,created,author from topic where author='egoing';  
mysql> select id,title,created,author from topic where author='egoing' order by id desc;  
mysql> select id,title,created,author from topic where author='egoing'
order by id desc limit 2;  
mysql>


[python 연동]

> pip install mysql-connector-python


import mysql.connector

mydb = mysql.connector.connect(
  host="localhost",
  user="root",
  password="1234",
  database="opentutorials"
)

mycursor = mydb.cursor()
mycursor.execute("SELECT * FROM topic")
myresult = mycursor.fetchall()
for x in myresult:
  print(x)

mycursor.execute("insert into topic (title,description,created,author,profile)
       values('sqlserver','sqlserver is ...',NOW(),'kaka','database administrator')");

# 데이터베이스 변경 내용 저장
mydb.commit()

출력물:

(1, 'mysql', 'mysql is ...', datetime.datetime(2023, 5, 10, 2, 39, 5), 'kdj', 'developer')
(2, 'oracle', 'oracle is ...', datetime.datetime(2023, 5, 10, 2, 41, 9), 'egoing', 'developer')
(3, 'postgresql', 'postgresql is ...', datetime.datetime(2023, 5, 10, 2, 43, 5), 'hahaha', 'data scientist, developer')
(4, 'mongdb', 'mongodb is ...', datetime.datetime(2023, 5, 10, 2, 43, 46), 'kaka', 'developer')
(5, 'sqlserver', 'sqlserver is ...', datetime.datetime(2023, 5, 10, 5, 16, 31), 'kaka', 'database administrator')


[References]

1. https://opentutorials.org/course/3161